Creating NewUser Page
The NewUser page is provided to the administrator user to create new a new user account. It needs to display a form that collects the information about the new user account. According to our database definition, we will need to collect the following information:
- username - string, required and unique
- email - string, required and unique
- password - string, required
- role - integer, required (either 0 or 1)
- first_name - string, optional
- last_name - string, optional
We create two files protected/pages/users/NewUser.page and protected/pages/users/NewUser.php to save the page template and page class, respectively.
Creating Page Template
Based on the above analysis, we write the page template as follows:
<%@ Title="My Blog - New User" %>

<com:TContent ID="Main">

<h1>Create New User</h1>

<span>Username:</span>
<com:TRequiredFieldValidator
    ControlToValidate="Username"
    ErrorMessage="Please provide a username."
    Display="Dynamic" />
<com:TCustomValidator
    ControlToValidate="Username"
    ErrorMessage="Sorry, your username is taken by someone else. Please choose another username."
    OnServerValidate="checkUsername"
    Display="Dynamic" />
<br/>
<com:TTextBox ID="Username" />

<br/>
<span>Password:</span>
<com:TRequiredFieldValidator
    ControlToValidate="Password"
    ErrorMessage="Please provide a password."
    Display="Dynamic" />
<br/>
<com:TTextBox ID="Password" TextMode="Password" />

<br/>
<span>Re-type Password:</span>
<com:TCompareValidator
    ControlToValidate="Password"
    ControlToCompare="Password2"
    ErrorMessage="Your password entries did not match."
    Display="Dynamic" />
<br/>
<com:TTextBox ID="Password2" TextMode="Password" />

<br/>
<span>Email Address:</span>
<com:TRequiredFieldValidator
    ControlToValidate="Email"
    ErrorMessage="Please provide your email address."
    Display="Dynamic" />
<com:TEmailAddressValidator
    ControlToValidate="Email"
    ErrorMessage="You entered an invalid email address."
    Display="Dynamic" />
<br/>
<com:TTextBox ID="Email" />

<br/>
<span>Role:</span>
<br/>
<com:TDropDownList ID="Role">
    <com:TListItem Text="Normal User" Value="0" />
    <com:TListItem Text="Administrator" Value="1" />
</com:TDropDownList>

<br/>
<span>First Name:</span>
<br/>
<com:TTextBox ID="FirstName" />

<br/>
<span>Last Name:</span>
<br/>
<com:TTextBox ID="LastName" />

<br/>
<com:TButton Text="Create" OnClick="createButtonClicked" />

</com:TContent>
The template is not much different from the Contact template and the LoginUser page. It mainly consists of text boxes and validators. Some text boxes, such as username, are associated with two validators because of the multiple validation rules involved.
Creating Page Class
From the above page template, we see that we need to write a page class that implements the two event handlers: checkUsername() (attached to the first custom validator's OnServerValidate event) and createButtonClicked() (attached to the "create" button's OnClick event). Therefore, we write the page class as follows:
class NewUser extends TPage
{
    /**
     * Checks whether the username exists in the database.
     * This method responds to the OnServerValidate event of username's custom validator.
     * @param mixed event sender
     * @param mixed event parameter
     */
    public function checkUsername($sender,$param)
    {
        // valid if the username is not found in the database
        $param->IsValid=UserRecord::finder()->findByPk($this->Username->Text)===null;
    }

    /**
     * Creates a new user account if all inputs are valid.
     * This method responds to the OnClick event of the "create" button.
     * @param mixed event sender
     * @param mixed event parameter
     */
    public function createButtonClicked($sender,$param)
    {
        if($this->IsValid)  // when all validations succeed
        {
            // populates a UserRecord object with user inputs
            $userRecord=new UserRecord;
            $userRecord->username=$this->Username->Text;
            $userRecord->password=$this->Password->Text;
            $userRecord->email=$this->Email->Text;
            $userRecord->role=(int)$this->Role->SelectedValue;
            $userRecord->first_name=$this->FirstName->Text;
            $userRecord->last_name=$this->LastName->Text;

            // saves to the database via Active Record mechanism
            $userRecord->save();

            // redirects the browser to the homepage
			$this->Response->redirect($this->Service->DefaultPageUrl);
        }
    }
}
In the above, calling save() will insert a new row in the users table. This intuitive feature is enabled by Active Record.
Note:
For simplicity, usernames in our blog system are case-sensitive! In many practical systems, usernames may be required to be case-sensitive. So special handling needs to be made when creating a new user account as well as
performing authentication. Also, the surrounding blanks in a username may need to be trimmed when creating a new account with it.
Testing
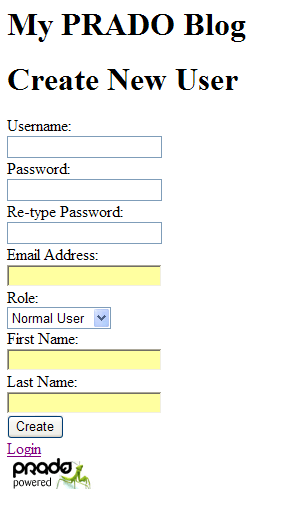
To test the NewUser page, visit the URL http://hostname/blog/index.php?page=users.NewUser. We shall see the following page output. Try enter different information into the form and see how the inputs are being validated. If all validation rules are satisfied, we shall expect the user account being created and the browser being redirected to the homepage.
Adding Permission Check
During testing, you may have asked: shouldn't the NewUser page be only accessible by the administrator user? Yes, this is called authorization. We now describe how we add this permission check to the NewUser page.
A straightforward way of performing permission check is in the page class where we check whether $this->User->IsAdmin is true, and if not we redirect the browser to the LoginUser page.
PRADO offers a more systematic way of checking page access permissions. To do so, we need to use page configuration. Create a file protected/pages/users/config.xml with the content as follows:
<?xml version="1.0" encoding="utf-8"?>
<configuration>
  <authorization>
    <allow roles="admin"/>
    <deny users="*"/>
  </authorization>
</configuration>
The page configuration contains authorization rules that apply to the pages under the directory protected/pages/users. The above configuration reads that users in the role admin can access all pages (see BlogUser.createUser() for why the word "admin"). For now all other users (users="*") are denied acess to pages in this directory - except for the LoginUser page which by convention can always be accessed.
Now if we visit the NewUser page as a guest, we will be redirected to the LoginUser page first. If our login as admin is successful, we will be redirected back to the NewUser page.
Tip:
Page configuration can contain more than authorization rules. For example, it can include
modules like we did in the
application configuration. For a PRADO application, each page directory can have a page configuration which applies to the pages in the same directory and all its subdirectories.